Blog Archives
More scenery at Chilcott’s Ck
More scenery work lately between Chilcotts Creek and Kankool.
Base application done with Woodland Scenics Fine Turf, then 2mm grass applied in random patterns.
Further application of longer grass will follow.

More scenery work at Chilcott’s Ck
Have been doing more scenery work lately between Chilcotts Ck bridge and Kankool.
Getting some scenery dirt down and more long grass.


Long grass
Following on from the diorama, I have applied the same techniques to the layout, starting with the area around the bridge.
Some time ago, I had initially applied the 2mm grass layer, but had gone no further, as I didn’t know how I was going to produce long, rough and woody grass. I had been experimenting with fake fur and similar materials, but could never get it to look right.
I think it’s starting to look pretty good. There is lots more to be done, even in this small area with weeds, trees, scrub etc.


Diorama
Over the last few weeks I have been working on applying scenery to a small diorama I initially made a few years ago. Up until now, it had just been sitting around with track ballasted but no scenery.
So out came the scenery dirt and static grasses. Still a work in progress as I am yet to finish the road. I was trialling different techniques to produce long grass. Basically, the first layer is 2mm fibres applied into Mod Podge glue. When that has dried, 3M Super 77 adhesive spray is applied over the top then a mixture of 4mm and 6mm fibres is applied over the top. Different colours are mixed together to get away from a uniform colour. Additional grass tufts, weeds etc are then added.


Scenery Update
Hi all.
I have applied some more 2mm static grass to the remaining bare section at the Werris Creek end of the bridge. I also had a play with colouring some fake fur I got at Spotlight. I used various colours of acrylic paint and rubbed into the fur with my fingers. I think it looks OK. The fur as it comes is a tad too long I think, so I’ll trim another section a bit shorter and try again.


End of 2017 Update
Hi all,
Yes, it’s been quite a while since the last update, but I have been busy!
I have pretty much concentrated on scenery work from Chilcott’s Ck through to Kankool, including shaping of scenery foam, applying scenery materials around the bridge and installing the front fascia board.
The pictures below show the results of foam carving and application of scenery ‘mud’.


Between this point in time and the next set of photos, the fascia was attached from the bridge towards Kankool. I prefer to carve the scenery foam to shape prior to fixing the fascia in place. Once I have the final contours shaped, some 3mm ply is cut to the required width to suit the highest point. I have allowed around 80mm ‘drop’ below the bottom edge of the benchwork. This will allow the fitting of curtains at a later date.
The piece of ply is held or clamped in position against the foam and a line traced against the scenery contour on the inside of the ply. The ply is then removed and cut to shape with a jigsaw.
The shaped ply is then glued and screwed to the layout.
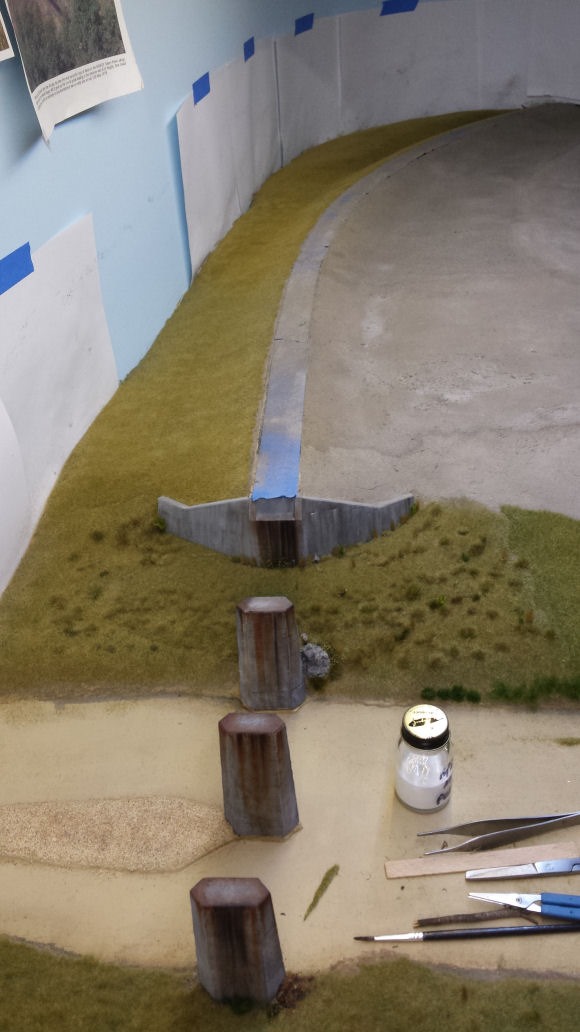
Next came the task of fixing the bridge piers in place.
The process was rather simple after much thought!! The bridge itself was placed in position on the abutments and held down with weights. Then each pier was checked for height to the underneath of the girders. Where required, some extra packing was glued down first. A gap of around 2mm was left between the top of the pier and the girder. Then the bridge was removed, a bed of Liquid Nails applied where the pier was to sit, then the pier was lightly pressed into the glue. The bridge was then placed back in position and weighted down again, pushing the pier into the glue. To make sure the pier did not sink into the glue while it was curing, small pieces of wood were chocked under it to make sure it touched the underneath of the girder. Each pier was left for at least 24 hours to allow the glue to set. The above sequence was repeated for the remaining piers.


As can be seen in the first photo above, I had to cut out a small section of the scenery between the first and second piers to allow access to the first pier, as it is partly buried in the ground. The small piece of foam has now been re-glued in position.


The pictures above show all piers in position and the bridge temporarily in place for checks.
The next task was to apply a base cover of scenery dirt around the bridge area. Coloured grout was used and sifted onto the foam using a small container with an old stocking stretched across the opening. A 3:1 mix of water and matte Mod Podge was brushed onto the foam, the grout applied and then fixed in position with the same glue mix applied using a fine mist spray bottle.

Then came the beginning of the fun stuff – applying grass!
I found some grass mat by Silflor and decided to use this around the bridge because it was going to be difficult to get the static grass applicator in close enough to the bridge piers.
The first piece was cut roughly to shape and placed in position for checking. I made sure the edges were ‘torn’ rather than cut with scissors to avoid a sharp edge.

The area was then masked off and a spray adhesive applied to the foam as well as the back of the grass mat. This was allowed to go ‘off’ to the point it was tacky and then the mat pressed into position.


The above picture shows grass mat fixed in position. The edges and joins will be hidden by more grass later.
Before I could finish applying the scenery dirt around the entrance to the layout from staging, I had to install the end section of fascia and valance. This proved quite tricky as it was a compound curve. The pictures below show it fixed in position and some shots of the rest of the fascia towards Kankool.


Next came the job of detailing the grass mat around the bridge. Various products from Silflor, Mininatur, Woodland Scenics etc were used. Fake fur was also used for grass tufts. It certainly takes away the ‘blandness’ of the original grass mat. The remaining scraps of grass mat were also glued down on the other side of the bridge with the remaining area covered by 2mm static grass in a matching colour.


A base cover of 2mm static grass was also added to larger areas. This will be later detailed with tall grass.
With the majority of grass work now complete around the bridge, I could now finish of the tracklaying either side of the bridge. I had previously left over length pieces of rail attached to the bridge to transition to the remaining track. It was just a matter of again sitting the bridge temporarily in position and laying more rail to meet up with the bridge rails. More fishplates were also added to this section.
I also completed the missing track link between the bridge and the Up staging yards.

Now that the track was pretty well complete from the staging through to Kankool, I decided to give it a coat of Krylon Camo brown. The surrounding areas were masked off and the track was sprayed.


A couple of shots of the bridge scene. The bridge is still just temporarily in position at the moment, as I want to pour the ‘water’ in the creek before permanently fixing it down. There is still quite a bit more detailing to go, but this can be done once the bridge is fixed in position.


Now that the track was complete from staging onto the layout, I added some fall protection to the short section there.


Well, that’s pretty much where the layout is up to at the moment.
This will be the last post on the blog as I have decided to create a Facebook page to continue to show progress on the layout. Please check it out. The blog will remain as an archive.
All the best to all my followers for Christmas and the New Year.
Cheers.
*** NOTE: As of 7 March 2021, I have decided to resume posting on this blog rather than on my Facebook page. I will move all the content from the FB page back here in dated order.
Layout progress update …
Hi all,
Apologies for the lack of updates since early Dec last year. I have been busy with some scenery in the Temple Court section as well as some more benchwork and spline construction.
Temple Court scenery
I’ve made a start on some static grass application but have not done much since Christmas. It’s been tricky getting the look and colours right, but I think it will look OK as it progresses.
Some pics below of the progress so far.


I still haven’t done any more with the rocky outcrop, but you can see lots of plaster castings sitting around for inspiration.
Lower level backscene, upper deck benchwork and spline
I also started installing the backscene from staging through Kankool, including the entry from staging onto the Chilcott’s Ck bridge scene.


The last picture above shows the new supports installed for the upper deck above Kankool as well for backscene support. As mentioned previously, I am using 3mm MDF as the backscene and this will be painted with the sky colour.
I had always planned to work on the lower deck scenery and trackwork from Chilcott’s Ck bridge to Ardglen first before the upper deck, mainly due to thinking I would have access issues on the lower deck for scenery work if I built the upper deck benchwork. In the last few weeks I have since decided to progress with upper deck benchwork, spline and scenery from Ardglen through to Pangela as the next stage.
This all came about after I had started to think about getting the bridge in place and laying track from staging through Kankool. But I realised that this may not be such a good idea as once the bridge was installed, and I had scenery in place, I would be working above all this with the ever present danger of things falling on the scene below.
So, the decision was made to continue with upper deck benchwork above Kankool and around to Pangela as well with spline construction from Ardglen to Pangela.
As I had already built the benchwork for Ardglen and the section above Chilcott’s Ck to Kankool some time ago (see previous post), I started to lay out the spline in this area.


As mentioned above, the plan is to continue with upper deck benchwork all the way from Kankool through Pangela and to build the spline from Ardglen to Pangela, then start on basic scenery formation. Once all the messy stuff with plaster is done on the upper deck, I’ll probably then look at getting the Chilcott’s Ck bridge installed and continuing with scenery through Kankool and beyond towards Ardglen.
Cheers for now.
