
Blog Archives
Bridge work continues
Another milestone for Chilcott’s Ck bridge today.
The guard rails have been fitted and weathered/blended to the rest of the bridge. The guard rails, which had been previously made up and pre painted, were superglued in position using spacers from the running rails.
This pretty much completes the bridge itself, however there is a lot more detailing to come for the overall scene.


Chilcott’s Ck ‘water’ pour done
Well, after two successful ‘water’ pours, and with a final one to come when some more Envirotex arrives, I decided to fix the bridge in position this afternoon.
The second pour still didn’t have quite enough tint to it, but that will be corrected with the final pour.
I used some grey caulk to fix the bridge to the piers and abutments; just the smallest of dabs so it didn’t squeeze out.
Overall I’m very happy with how the Envirotex has worked. More photos to come.


End of 2017 Update
Hi all,
Yes, it’s been quite a while since the last update, but I have been busy!
I have pretty much concentrated on scenery work from Chilcott’s Ck through to Kankool, including shaping of scenery foam, applying scenery materials around the bridge and installing the front fascia board.
The pictures below show the results of foam carving and application of scenery ‘mud’.


Between this point in time and the next set of photos, the fascia was attached from the bridge towards Kankool. I prefer to carve the scenery foam to shape prior to fixing the fascia in place. Once I have the final contours shaped, some 3mm ply is cut to the required width to suit the highest point. I have allowed around 80mm ‘drop’ below the bottom edge of the benchwork. This will allow the fitting of curtains at a later date.
The piece of ply is held or clamped in position against the foam and a line traced against the scenery contour on the inside of the ply. The ply is then removed and cut to shape with a jigsaw.
The shaped ply is then glued and screwed to the layout.
Next came the task of fixing the bridge piers in place.
The process was rather simple after much thought!! The bridge itself was placed in position on the abutments and held down with weights. Then each pier was checked for height to the underneath of the girders. Where required, some extra packing was glued down first. A gap of around 2mm was left between the top of the pier and the girder. Then the bridge was removed, a bed of Liquid Nails applied where the pier was to sit, then the pier was lightly pressed into the glue. The bridge was then placed back in position and weighted down again, pushing the pier into the glue. To make sure the pier did not sink into the glue while it was curing, small pieces of wood were chocked under it to make sure it touched the underneath of the girder. Each pier was left for at least 24 hours to allow the glue to set. The above sequence was repeated for the remaining piers.


As can be seen in the first photo above, I had to cut out a small section of the scenery between the first and second piers to allow access to the first pier, as it is partly buried in the ground. The small piece of foam has now been re-glued in position.


The pictures above show all piers in position and the bridge temporarily in place for checks.
The next task was to apply a base cover of scenery dirt around the bridge area. Coloured grout was used and sifted onto the foam using a small container with an old stocking stretched across the opening. A 3:1 mix of water and matte Mod Podge was brushed onto the foam, the grout applied and then fixed in position with the same glue mix applied using a fine mist spray bottle.

Then came the beginning of the fun stuff – applying grass!
I found some grass mat by Silflor and decided to use this around the bridge because it was going to be difficult to get the static grass applicator in close enough to the bridge piers.
The first piece was cut roughly to shape and placed in position for checking. I made sure the edges were ‘torn’ rather than cut with scissors to avoid a sharp edge.

The area was then masked off and a spray adhesive applied to the foam as well as the back of the grass mat. This was allowed to go ‘off’ to the point it was tacky and then the mat pressed into position.


The above picture shows grass mat fixed in position. The edges and joins will be hidden by more grass later.
Before I could finish applying the scenery dirt around the entrance to the layout from staging, I had to install the end section of fascia and valance. This proved quite tricky as it was a compound curve. The pictures below show it fixed in position and some shots of the rest of the fascia towards Kankool.


Next came the job of detailing the grass mat around the bridge. Various products from Silflor, Mininatur, Woodland Scenics etc were used. Fake fur was also used for grass tufts. It certainly takes away the ‘blandness’ of the original grass mat. The remaining scraps of grass mat were also glued down on the other side of the bridge with the remaining area covered by 2mm static grass in a matching colour.


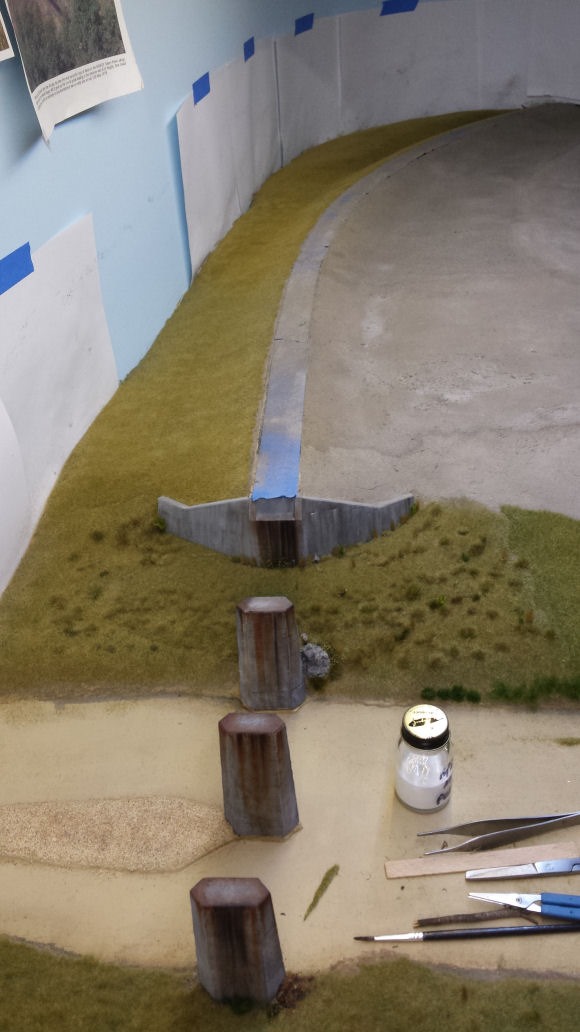
A base cover of 2mm static grass was also added to larger areas. This will be later detailed with tall grass.
With the majority of grass work now complete around the bridge, I could now finish of the tracklaying either side of the bridge. I had previously left over length pieces of rail attached to the bridge to transition to the remaining track. It was just a matter of again sitting the bridge temporarily in position and laying more rail to meet up with the bridge rails. More fishplates were also added to this section.
I also completed the missing track link between the bridge and the Up staging yards.

Now that the track was pretty well complete from the staging through to Kankool, I decided to give it a coat of Krylon Camo brown. The surrounding areas were masked off and the track was sprayed.


A couple of shots of the bridge scene. The bridge is still just temporarily in position at the moment, as I want to pour the ‘water’ in the creek before permanently fixing it down. There is still quite a bit more detailing to go, but this can be done once the bridge is fixed in position.


Now that the track was complete from staging onto the layout, I added some fall protection to the short section there.


Well, that’s pretty much where the layout is up to at the moment.
This will be the last post on the blog as I have decided to create a Facebook page to continue to show progress on the layout. Please check it out. The blog will remain as an archive.
All the best to all my followers for Christmas and the New Year.
Cheers.
*** NOTE: As of 7 March 2021, I have decided to resume posting on this blog rather than on my Facebook page. I will move all the content from the FB page back here in dated order.
Chilcott’s Creek bridge assembly – Part VI …
Hi all,
A brief update on some more progress on the Chilcott’s Creek bridge scene.
The bridge abutments are now fixed in position, and most of the foam is also fixed down.


I also did some more weathering to the bridge piers. Following on from the previous Part V post, the rust streaking was done using oil paints and turps to drag the colours down the piers.

I’m quite happy with the results with some more work to be done.
Cheers.
Chilcott’s Creek bridge assembly – Part V …
Hi all,
I have recently been redoing the weathering on the Chilcott’s Ck bridge abutments and piers. I wasn’t happy with my first attempt using the acrylic crayon powders quite a while ago. So, this time using oil paints, I applied an all over light grey colour using a stippling brush and I think it has produced a neat effect. Then using other colours like black, white and more grey, I have again stippled over the top for a random effect. For the rust staining, I used the oils again but washed them down with turps. Again pretty happy with the results so far.


I have also finished the “base” grey coat on the piers and will let that dry before moving onto the rust staining.

I have also made some more progress on the Chilcott’s Ck bridge scene over the last few days. A slight change of plans to what I mentioned previously, in that I have decided to fix the timber sub-module base in place then add the scenery foam around and on top of it. The abutments will then be fixed in place, along with the piers. Scenery including dirts and grasses will then be applied, and hopefully some ‘water’ in the creek! The bridge span will then be fixed in place once all this has been completed. Pictures show all the foam pieces and the sub-module base temporarily in place.
A plywood base was fixed in place to provide support for the foam.

With the bridge sub-module sitting in place, a jigsaw of various pieces of foam were cut to fit. First off were two pieces front and back to continue the creek bed, which was drawn in and then routed out to the same depth as on the timber sub-module.

Then other pieces of foam were cut and shaped to fit the previously made pieces under the bridge.


The last two pictures show the bridge span and piers temporarily in place to give an idea of how the scene will look. Final shaping of the foam will be done when the pieces are fixed down.


Cheers.
Chilcott’s Creek bridge assembly – Part IV …
Hi all,
Recently I have continued work on the Chilcott’s Creek bridge scene.
Back in December 2014, I made a post where I had started to weather the bridge piers and abutments.
I was never really happy with how the colour on the abutments had turned out, so I decided to redo them.
Using some new oil based paints and some new techniques, I mixed up a new lighter colour of grey and applied to the abutments. I am happy so far with the result. The paint was stippled on and has given a rougher surface appearance. I’ll redo the rust stains as well. I think I will also redo the piers.
I also added the small extensions to the wingwalls.


The plan was always to build the bridge on a sub-assembly and then slot it into place. As the base of the sub-module needed to be near to perfectly flat, I decided to laminate a piece of 3-ply to another piece of hardwood. I roughly marked out the future riverbed and removed the first layer of ply using a router. My idea is to eventually try my hand at some model water.


I have also started on forming the scenery around the bridge. The idea is to form up the base scenery foam, add the dirts, grasses etc then assemble the bridge, fix the sub-assembly into the layout, levelling up as I go. Anyway, we’ll soon see if that plan works!!


The last photo shows the bridge & piers temporarily in place. You get the idea!!
Some months ago I started laying tieplates on the bridge and have fixed one rail in place. I had been thinking of ways to do it easily, including making a jig, but Andrew suggested I just line them up against a straight edge.
The frets of the tieplates were masked off where the base of the rail sits, painted with some Krylon flat brown paint, then dusted a ‘rusty’ colour with some powders.
The underside of the tieplates were then coated with Pliobond glue.


The individual tieplates were then cut out and located on the transoms, one at the end and the other about 40 transoms away. Using a soldering iron, the tieplates are bonded to the transoms. The heat activates the Pliobond. This then gave me two points to line the straight edge against. The straight edge was clamped to the bridge. More tieplates were then bonded to the transoms. The process was repeated along the bridge.


The next step was to fix one length of rail to this first run of tieplates. This was done by applying the Pliobond to the underside of the rail as well as the tops of the tieplates, then locating the rail in position and carefully applying heat to the top of the rail using an old clothes iron and gradually moving along the length of the bridge. The bond appears to be OK so far.
The plan is to then, using gauges, locate more tieplates underneath the second rail and repeat the above process.
Enjoy!
More foam roadbed & CV track installation …
Hi all,
I have completed installation of the foam roadbed all the way from Chilcott’s Ck almost to Ardglen. I have also laid quite a bit more CV track base from Chilcott’s Ck through Kankool to just before the first peninsula.
The process was the same as outlined here when I did the Temple Court section.
Under where the turnouts are located at Kankool, I laid 3mm cork down instead of the foam. This was done to make it easier cutting out a hole for the future throwbar rather than trying to cut it out of the soft foam. In hindsight, I probably only needed a small section of cork directly under the toe of each turnout rather than under the whole turnout. That is what I will do on future turnouts.


Taking on board an idea from Andrew, I also commenced installing strips of the high density yellow foam to the sides of the spline. The idea here is to lay continuous foam strips along the spline to not only allow for shaping the trackbed, ballast profile and drainage, but to also make it easier to install the main scenery foam later on, rather than trying to cut many small irregularly shaped foam pieces to try and fit against the spline.

Cheers.
Chilcott’s Ck bridge transoms – Part III …
Hi all,
Today I made another jig to enable application of white paint on the ends of the transoms.
Up until a few days ago, I had no idea as to why the ends were painted white, but after obtaining some info from two fellow modellers, it appears it was a form of timber preservation treatment.

The simple jig was made from styrene strip and it sat over the transom leaving a six inch piece exposed at the end. Some acrylic white paint was then dry brushed on the top, sides and end of each transom. The resultant finish I think looks like the white paint has been there a few years.
The following two pictures show the finished result.


Cheers.
Chilcott’s Ck bridge transoms – Part II …
Hi all,
Transom installation is now complete on the Chilcott’s Ck bridge.
After the initial staining mentioned in the previous post, I thought the transoms ended up a bit too light, so I attacked them with some of the crayon powders, and I think they look heaps better. The plan is to do more weathering using the powders after the rails have been installed.
I had thought a fair bit on what type of glue to use for fixing the transoms to the girders, and after seeking advice from fellow modellers, I decided to use Tarzan’s Grip. I had thought about using 5 minute Araldite, but there’s just not enough working time with the stuff, and the normal Araldite takes hours to completely set. The Tarzan’s Grip cures in thirty minutes and remains usable for about ten minutes.
There are ninety eight transoms on the bridge and I decided to fix down ten at a time.
The first transom was fixed in place, ensuring it was square to the girders, and allowed to set before commencing the others.
The spacing between transoms was made at eight scale inches using pieces of styrene strip.

After gluing a batch of transoms in place, some old Kadee uncoupling magnets are placed on top to keep things flat and using the bottle of Tarzan’s Grip as a weight, are left to cure for thirty minutes.

A progress shot.

Transoms complete!

Next job is to make a jig for locating the tieplates on the transoms.
Cheers.
