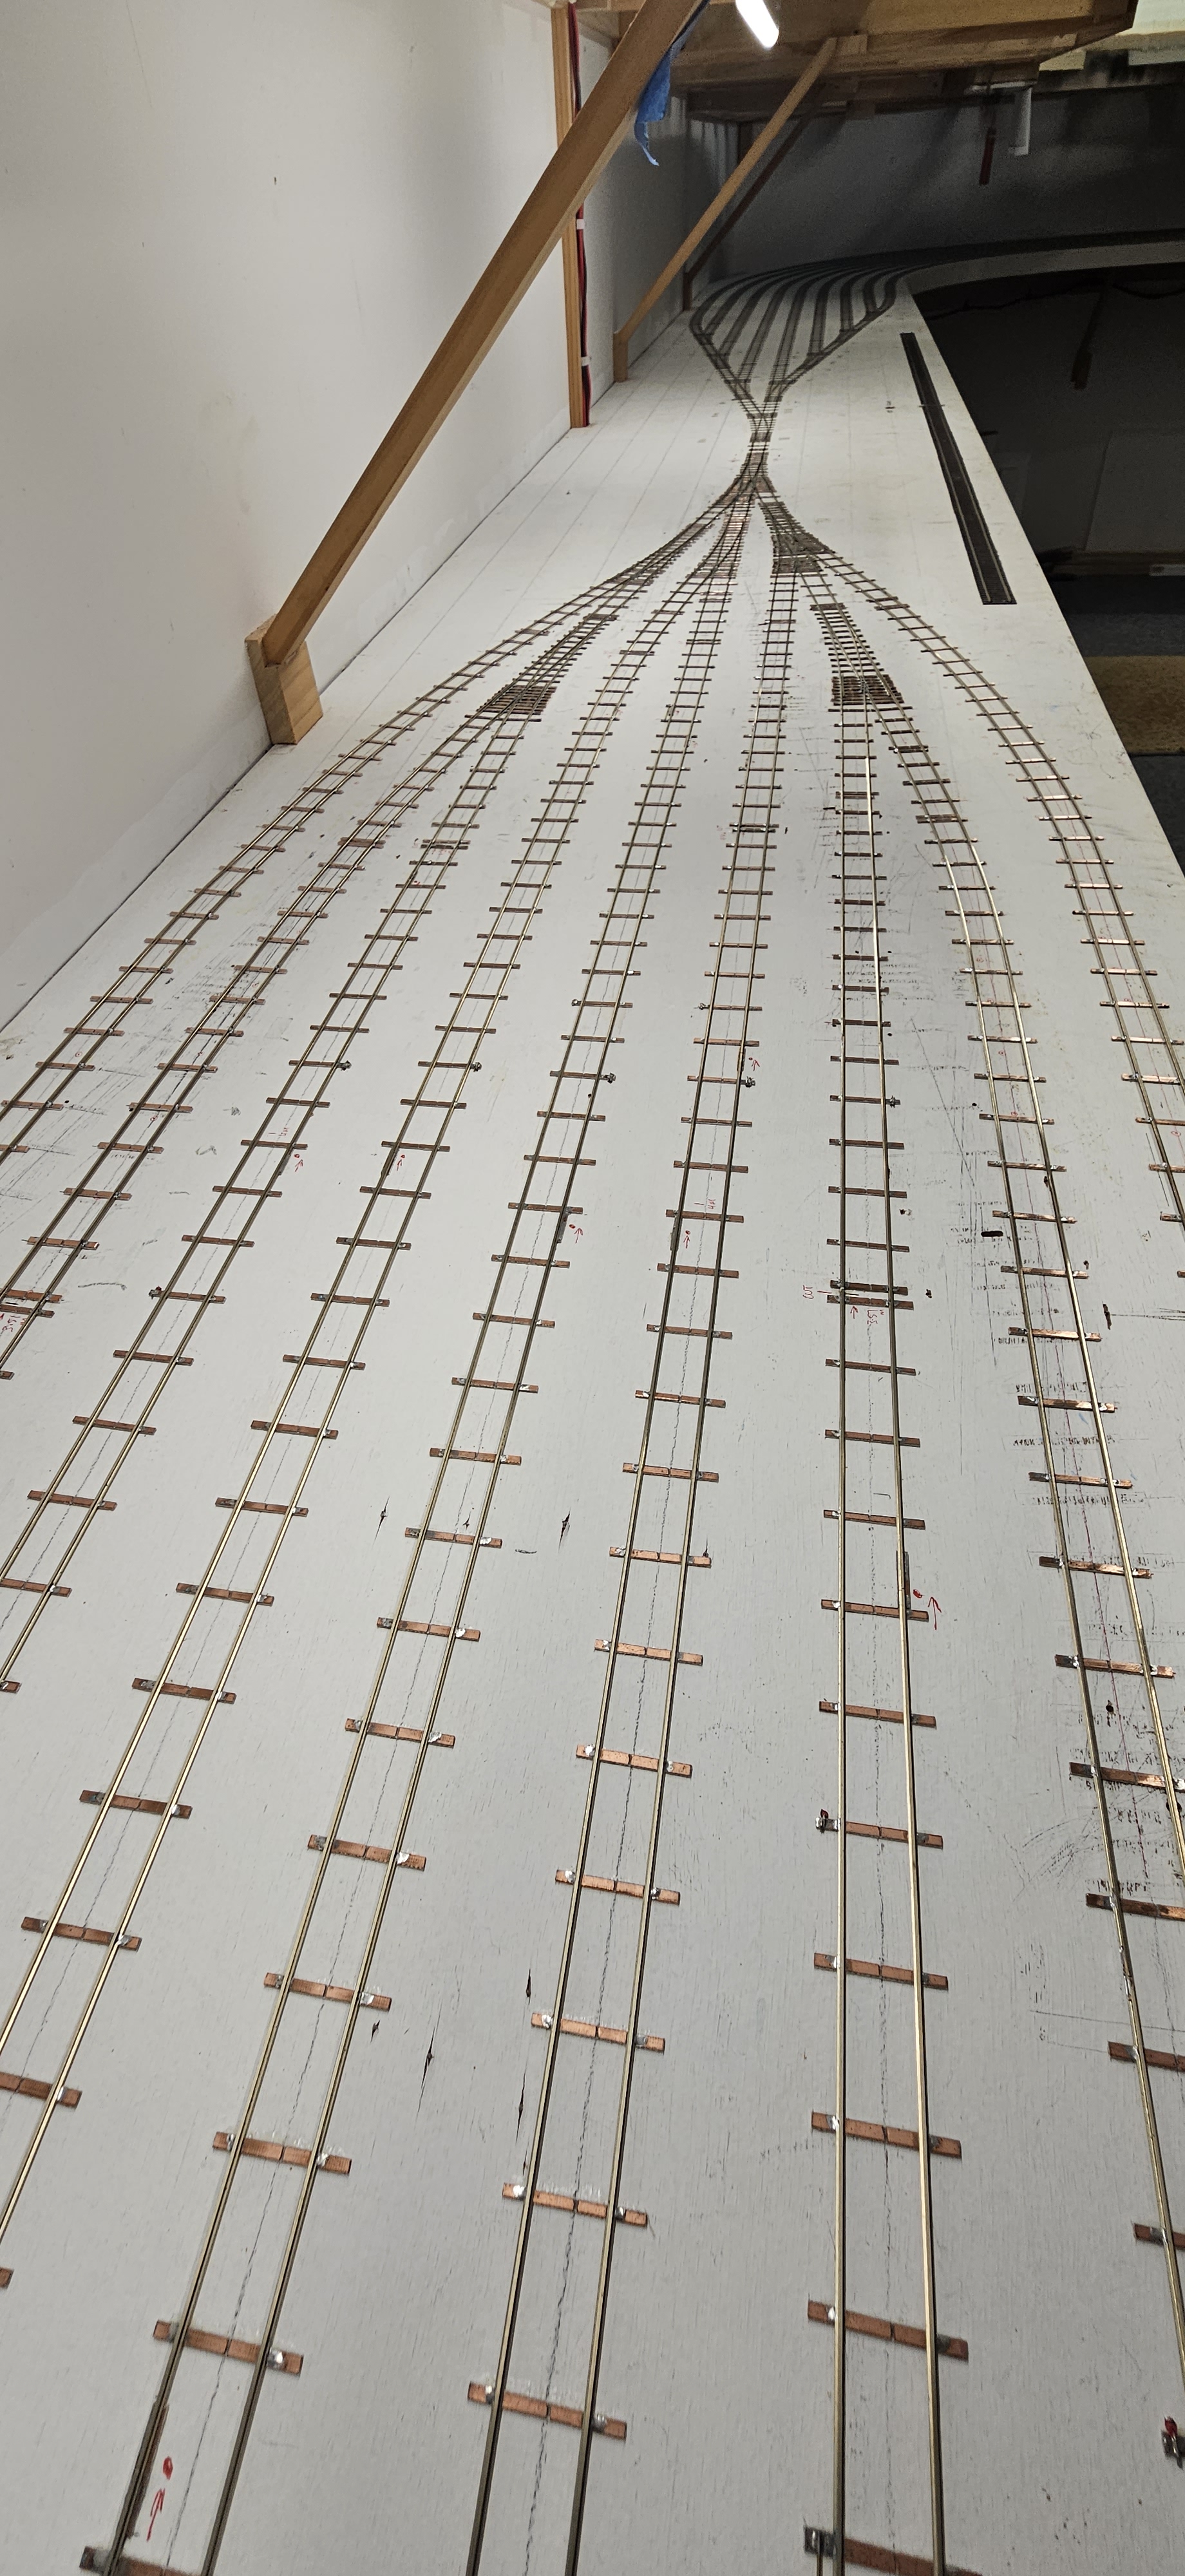
UP staging yard extension complete
Yesterday I completed work on the extension of the UP staging yard.
As mentioned in previous posts (Jan 2017 and Feb 2023), the decision was made to lengthen the UP staging yard roads. The final 3-way turnouts along with four extra LH and RH 1:6 turnouts were built and fixed in place and extra track added to the existing roads to tie them in.
All that I have to do now is redo the track feeder wiring and re-mount the motors underneath.

Layout update
Over the last couple of months, I have installed a lot of the xps foam between Doughboy Hollow and Ardglen and painted the backscene and ceiling “sky” blue.

The roadway was formed by cutting out tapered strips of the foam at the same gradient as the railway and gluing down, following the curves I had previously marked out using some scrap pieces of thin foam, allowing it to bend and find natural easements.
Once these were in place, extra foam was glued down to build up the embankment between the road and railway. This will be carved to shape later, as will the rest you see above the railway line.


As I was installing the foam in front of the track where the ballast siding is, I nearly forgot that there will be a couple of lever frames here to operate two turnouts. So after some quick designing, some recessed boxes were built into the benchwork to house these future lever frames.


The next jobs planned are to carry out some more ballasting between Doughboy Hollow and Ardglen where the track currently ends. I have also commenced work on some more turnouts for Ardglen with the aim to install these so I can lay more tangent track through Ardglen and through the tunnel. Carving of the scenery foam will also take place.
Cheers.
More coal wagons delivered
Today I received my order of the IDR Models CHS coal hopper.
These will form my two 21 wagon loaded coal trains.

Another superb model from the IDR team.
Well, I’m still here..!
Hi all,
Apologies for the lack of posts since April 2022. Here’s a brief catch up.
Bogie Ballast Plough
I completed the assembly and detailing of the Stephen Johnson Models bogie ballast plough kit.


I got it to the point where it received a primer undercoat, but that got stripped off again as I wasn’t happy with the finish. It’s currently still sitting on the workbench.


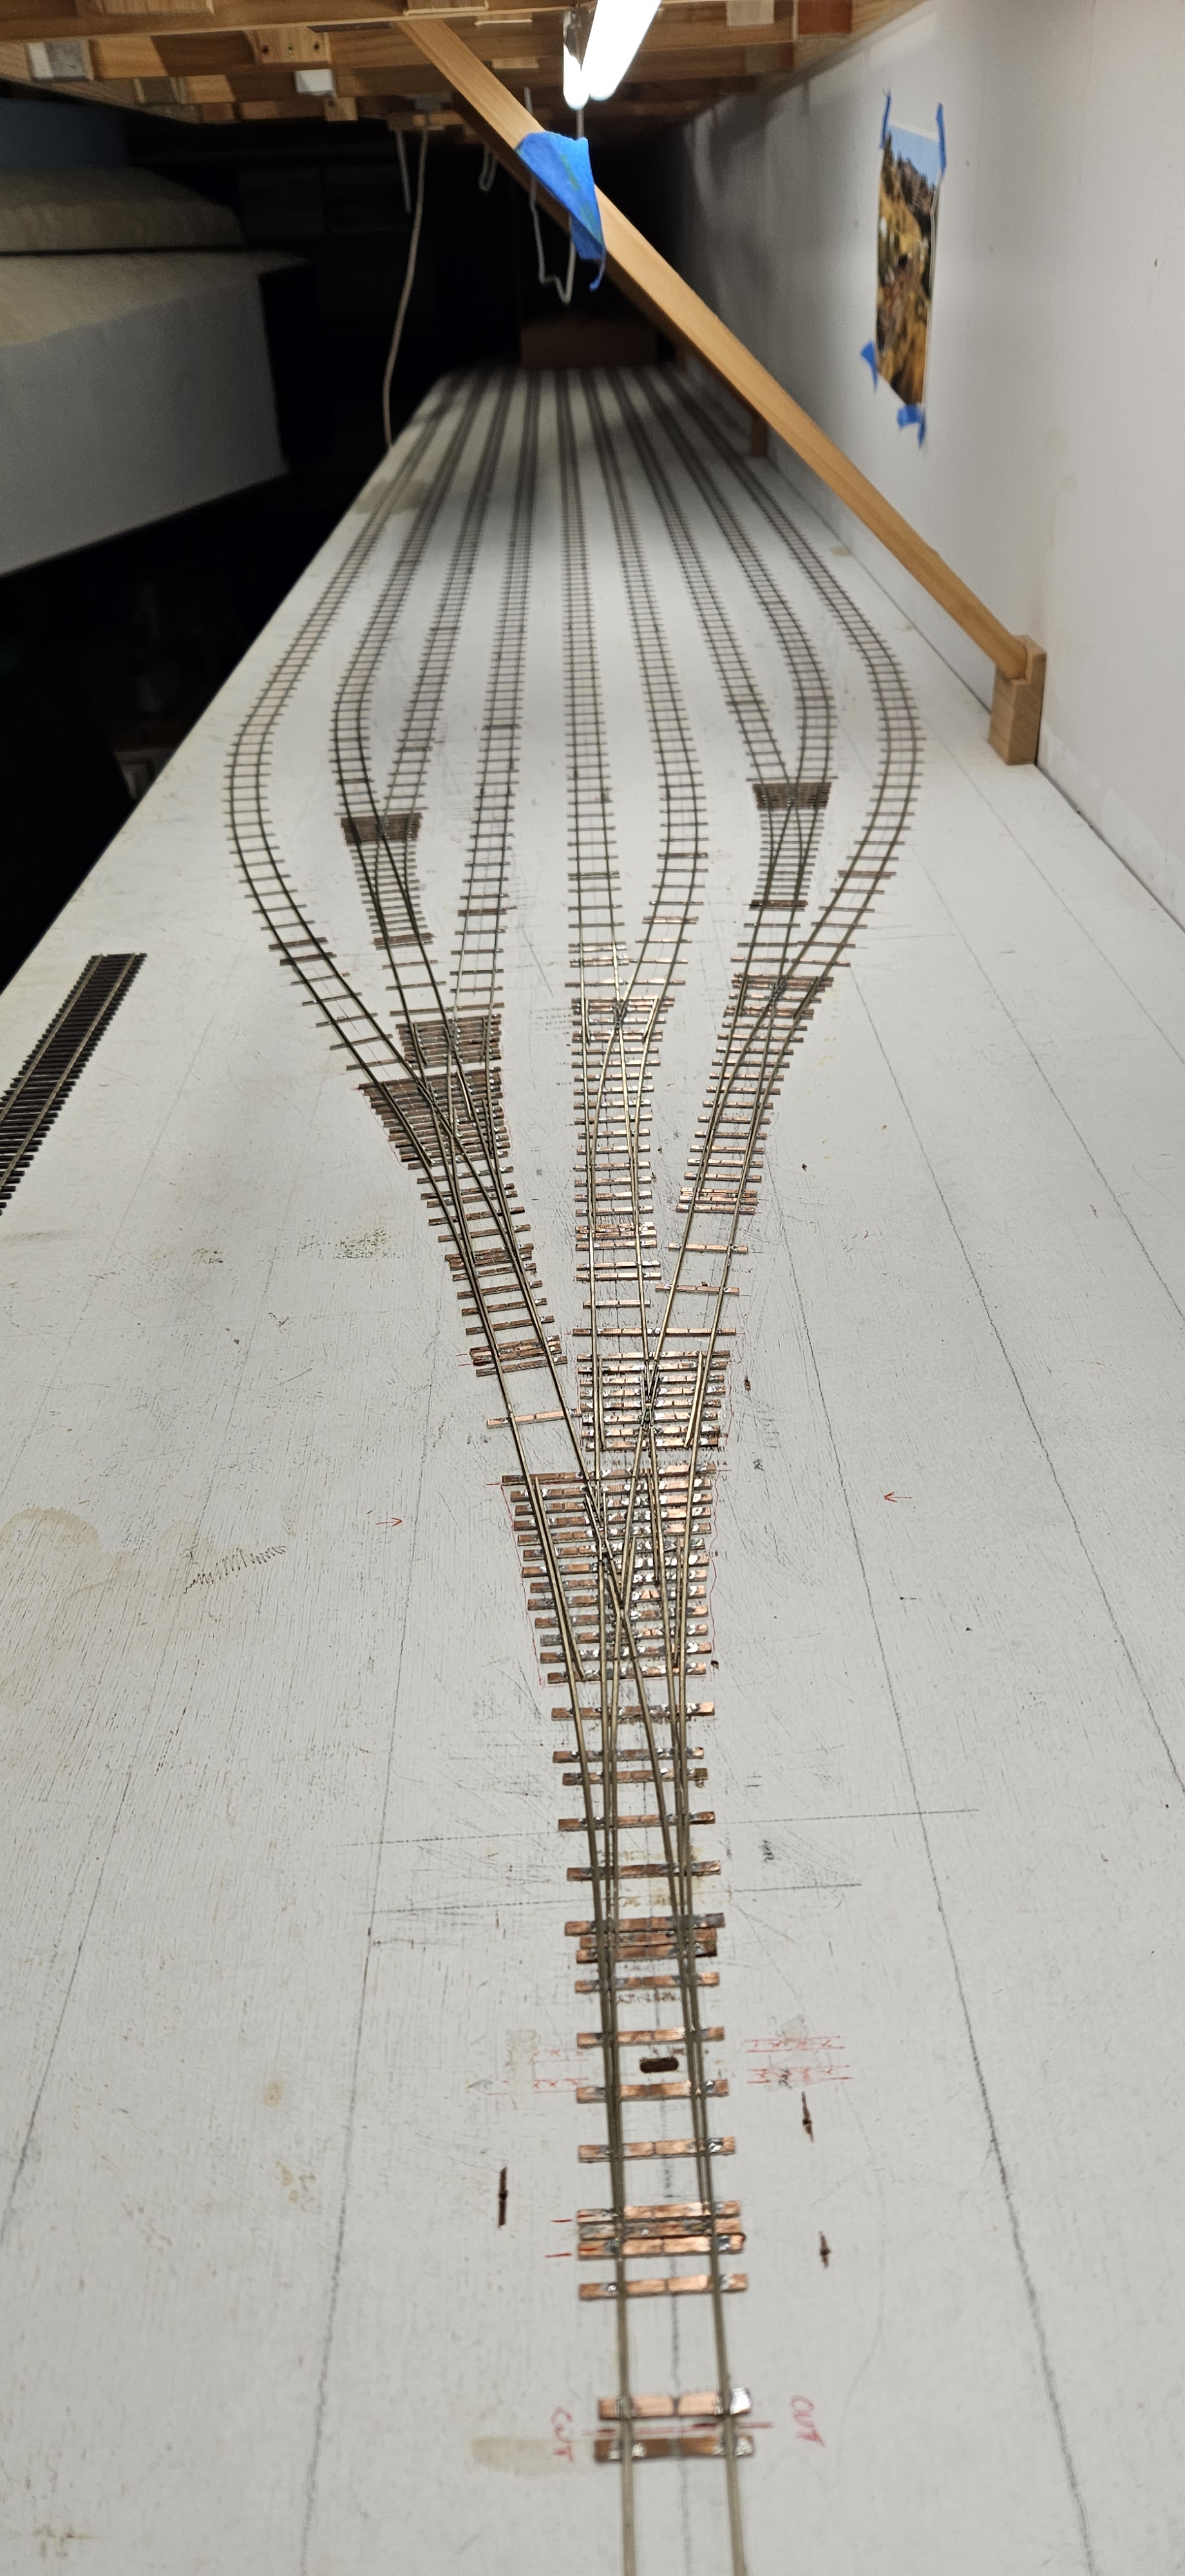
UP Staging Yard extension – Part 3
Work commenced on removing the existing turnouts at the other end of the Up staging yard to accommodate some new 3-way turnouts to complete the lengthening of these yards.
All the turnouts were removed and the PCB sleepers and rail salvaged. Two new 3-way turnouts were built.


New source of XPS foam for scenery
Ever since Bunnings ceased stocking the Knauf XPS foam sheets, I had spent time trying to source a replacement. I contacted a few suppliers but most wanted exorbitant shipping costs to Port Macquarie. I eventually found a building supply company near Canberra that could ship unlimited sheets to me for only $85. So an order of 25 sheets (2400 x 600 x 30mm) was placed just prior to Christmas. The cost per sheet came to $28, and as these were double the size of the old Knauf ones, they ended up being about $4 more expensive. I can live with that. Having replenished my stock of foam, I can now resume scenery work between Doughboy Hollow and Ardglen.

Spline prep at Ardglen for future turnout controls
One of my goals for this year is to continue tracklaying through Ardglen and onto Pangela. For this to proceed, some cutting of the spline at the turnout locations was necessary.
The locations in the main area of Ardglen were quite straightforward. This involved removing a section of spline with a router down to a depth of approximately 6mm to accommodate a piece of ply. Once this was glued in position, the remaining spline underneath the ply was cut away. Extra supports either side of the cut-out are also installed where required.


However, the turnout leading from the loop extension into the ballast sidings required a bit more thinking of how to get the router in there, considering I had already laid track on the mainline.
So a plan was devised to support the router over the mainline track using some old melamine shelving that I had. This did the job well.


New motive power arrives
In the last week, Auscision Models delivered their ALCo 44 class locomotives. I had pre-ordered four of these Mark I type. Another superb model. Looking forward to weathering these beasts.

As I mentioned above, I hope to complete a lot of work on the layout this year. One of the first jobs is to complete the ceiling panel and backscene prep over Ardglen for the sky blue paint. Then I want to get back into some scenery foam installation around Ardglen and where the tunnel will start. Once a few of the turnouts for Ardglen are complete, I can also commence tracklaying through Ardglen, through the future tunnel and onto Pangela.
That’s it for this update.
Cheers.
Ceiling panel install Doughboy Hollow to Ardglen completed
The final panel was installed yesterday. I have also temporarily installed the lighting to finalise their locations.
The next step is to remove the lights, fill the joins, undercoat the ceiling then paint with the sky colour. The lights will then be re-installed. I am very pleased with how it’s all come together. There is now plenty of light to continue trackwork and scenery in this section.
The top valance/pelmet will most likely be installed after the majority of scenery is complete.


Ceiling panel install
I have started on the ceiling install as mentioned the other day.
I decided to make a panel for each segment based on the framework as it goes around the curved part of the peninsula.
The first two went up nice and easy as there is no backscene at this point. This will be installed later.

When I did the ceiling for the upper deck above Kankool, I had secured the ceiling panels using screws, but this was a lot of work and used up a lot of screws.
I had intended to keep going with this method so screws were used on the first two panels above.
Again, a lot of screws were used and I thought there had to be another way to do this.
So I looked into using small nails (brads) and looked around for a small nailing gun.
I found one for $40 and also bought a box of 2000 15mm brads for $3.95.
So, the first two panels had their screws removed, panels removed and woodworking glue applied to the joining surfaces, refitted in place and nailed. Much easier and quicker!!
The next panel was a bit trickier as it is starting to go around the curve. Once a piece was roughly cut to size, it was test fitted and the rear curve traced and cut. Because the backscene board is already installed at this location, I had to come up with a way of supporting the back edge of the ceiling panel, so I decided to cut a notch into the rear edge of the ceiling panel and a corresponding cut-out in the top edge of the backscene panel. This worked quite well.


At the same time, the front edge of the ceiling panel is also cut to the shape that the valance will follow.
I have got a bit of a system going now, so the rest of the panels should go up with ease.
Diorama Modelling
I recently came across a fantastic YouTube channel. Check out Boomer Diorama; The Immersive Model Railroad.
There are lots of fantastic tutorials on his weathering and scenery techniques as well as commentary on why he does what he does.
I’ll be definitely trying out some of his techniques.
Ceiling & valence framework installed
Hi all,
It’s been a while between posts!
However, I have been busy. I have been installing more scenery ‘mud’ on the large embankment and partly around the next peninsula towards Ardglen. The track has also been ballasted up to there as well.
I had come to a point where I realised to progress further, I needed to install more lighting.
I had always just moved around temporary fluro lights to where I was working, but this was becoming tiresome.
So the decision was made to install framework for the ceiling and valance from midway above the large embankment all the way through to Ardglen. This will enable me to permanently install the lighting for this section, so that I can continue to work in a well lit area. The same framework was also installed for the future top deck section back to Kankool.
Most of the layout timber work is from DAR pine, 70 x 19mm and 42 x 19mm. However, I was looking to save some money from this point onwards, so I decided to purchase large sheets of 19mm plywood and rip these down into 70mm and 42mm wide strips. The cost of the plywood is about half that of the equivalent DAR pine.


The ceiling will be made from 3mm MDF and painted the sky blue colour. The lighting will then be installed along with the valance up to Ardglen.
More photos will be added as the ceiling installation progresses.
Coal hoppers arrive
Yesterday I received my order of CTS coal hoppers from Auscision Models.
These will form my empty 24 wagon coal train hauled by two 45 class locomotives.
I set the train up on the layout to get an idea of its length.
Once again, a very nice model from Auscision.
Click on the images for larger versions.


Recent arrivals
Some new models have recently been acquired.
The rivetted bogie ballast hopper (BBW) from IDR Models and bogie ballast plough van (BBP) from Stephen Johnson Models.
The BBW is a ready-to-run model available in 3-car packs. It is very nicely done, having some very fine detail.


The BBP is a composite kit comprising polyurethane castings, nickel silver and brass etchings and lost was brass castings. I believe all of the patterns for this kit were 3D printed then cast in polyurethane and brass. The detail in the kit is superb, right down to the rivets on the sides and hinges and padlock on the gas cylinder compartment doors.


